1. How do I sign up or sign in?

  • Go to roadbotics.com and click the yellow “Sign Up Free” button at the bottom of the home page.
  • The button will take you to the sign up page on app.agilemapper.com.
  • Complete the form and click the “Create Account” button at the bottom of the form.
  • You will receive a verification email.
  • Click the verification link inside the email to verify the account.
  • Once account is verified, you can sign in to AgileMapper at app.agilemapper.com/login.

2. What if I forgot my password?

If you forget your password, simply click the “Forgot Password” link on the login page. You will receive an email to reset your password.

3. How do I change my password?

If you need to change your password, go to your account by clicking your avatar in the top right corner of the AgileMapper desktop platform.

  • Click the Security tab on the left hand side of the screen.
  • There you will find the Change Password form.
  • Fill out your current password and new password.
  • Click the “Apply” button to apply the changes to your password.

4. How do I invite users to AgileMapper?

Invite Users to a Map

  • When on the AgileMapper Maps page (home page), find the user avatars visible with each Map Card on the left hand side of the screen. 
  • Click on the Add User icon or any of the user avatars visible with the projects and a drop down will appear. 
  • Inside that drop down is an “Invite More” link. 
  • Click that link, and it will send you to a new page where you add the new user(s) email address and select their permission level.

Invite Users to an organization through the Administration tab

  • Click the “Administration” tab in the top menu bar of the AgileMapper platform. 
  • Click the “Users” tab in the lower menu bar.
  • Then click the “Invite User(s)” button on the far right
  • A pop up will appear. Inside the pop up, add the new user(s) email addresses. 
  • Then select the organization you wish to invite the user(s) to in the drop down menu.

Invite users to a map while creating a map

  • While creating a new map, you will find text fields to add users to it.
  • You have the option to add multiple users to the map at various permission levels.
  • You can add users that are already AgileMapper users or new users. It doesn’t matter if these users have an existing AgileMapper account or not. 
  • After clicking “Create”, the users will receive an invite to your map and if necessary will create a new AgileMapper account. 

5. What are the different permission levels?

  • Project Lead: If your project requires a Project Lead to manage the map, add them here. There can be more than one Project Lead. 
  • Members: Add Members to the map. These are your core contributors and likely your field crew or boots on the ground. There is no limit on the number of Members.
  • Sub-Members: Add Sub-Members if you are working with someone outside your organization and only want to grant them access to this map but nothing else. There is no limit on the number of Sub-Members.
  • View Only: Add View Only users to the map if you want someone to view the map but not contribute or edit its contents. There is no limit on the number of View Only users.

6. How do I create maps?

  • When on the AgileMapper “Maps” page (home page), click the “Create Map” button on the far right of the screen. You can also click the “Create Map” button inside the “Administration” page, under the “Projects” tab. 
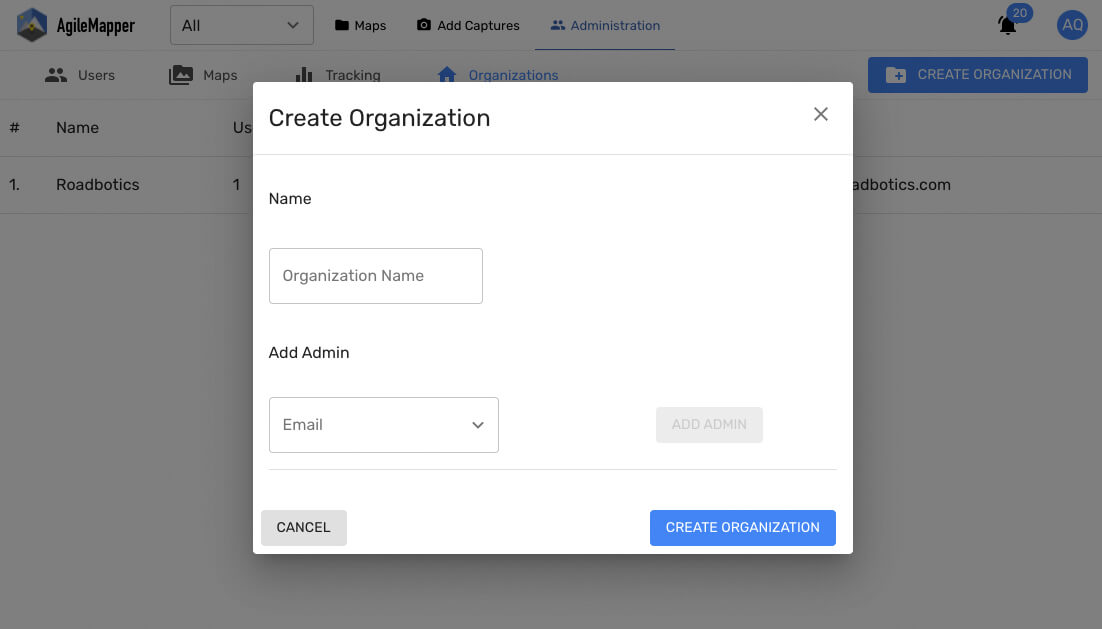
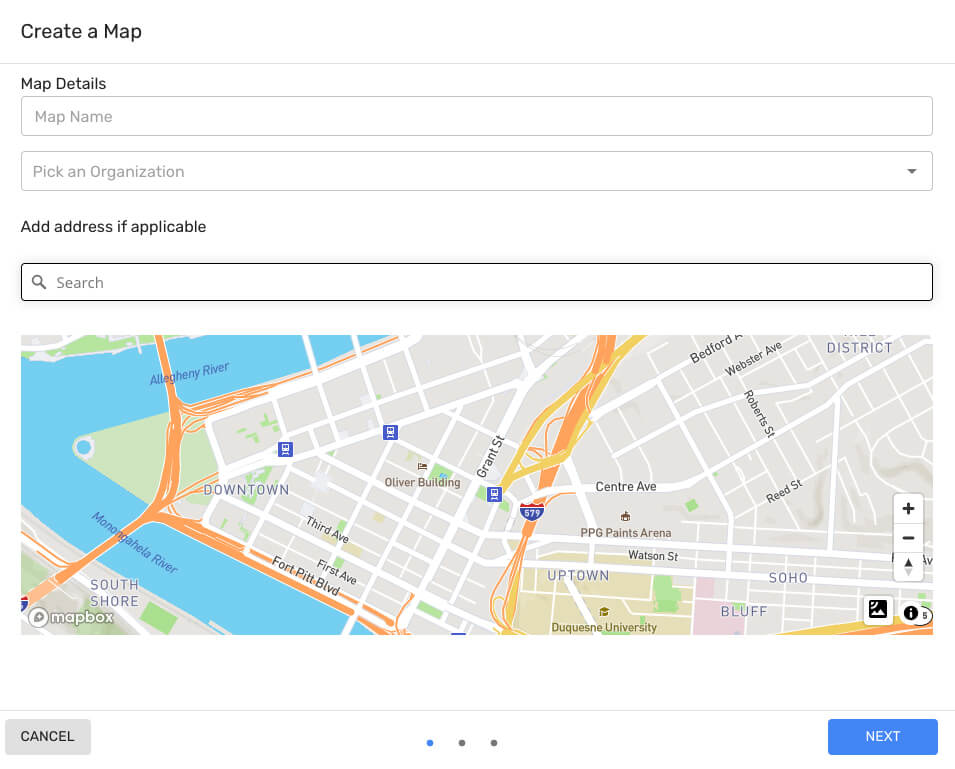
  • The button will open a Map Creation pop up. 
  • Name your map.
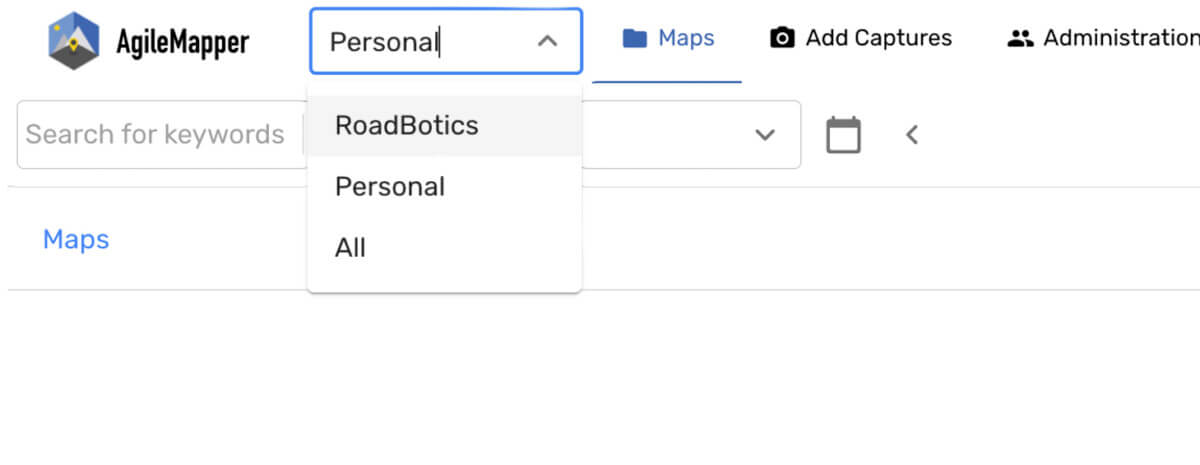
  • Pick an organization from the “Pick an Organization” drop down menu. If the drop down is blank, you can type an organization into the space or leave it blank.
  • If the map is taking place in a set location, add an address. Otherwise, do not add a location. If you set a location, GPS data for each image will default to that location. If you’re capturing images in multiple locations or across a region, it’s best to leave the location blank.

7. How do I add users to maps?

  • While in the Create Map screen,  click “next” to add users to it. 
  • Add the users email address into the invite users text field. 
  • As each user is added, their email address will appear in the space below and a drop down will appear for you to add a permission level to the user. 
    • If your Map requires a Project Lead to manage the map, add them here. There can be more than one Project Lead. 
    • Add Members to the map. These are your core contributors and likely your field crew or boots on the ground. There is no limit on the number of Members.
    • Add Sub-Members if you are working with someone outside your organization and only want to grant them access to this map, but nothing else. There is no limit on the number of Sub-Members.
    • Add View Only users to the project if you want someone to view the map but not contribute or edit its contents. There is no limit on the number of view only users.

8. How do I add visual data to a map?

Add visual data while creating a map on Desktop App:

  • The final step of the map creation process is adding visual data. 
  • You can always add visual data later either through the mobile app or on the desktop; however, if you have some on your device relevant to the project and easily accessible, simply click the “Have Images Already?” button.
  • Check the “Label Images” checkbox for the A.I. to run on the images. 
  • Then you’ll see a pop up appear over the page. 
  • Click the blue button that says “Click to select some files…”
  • Once you select the images from your device, you will see a preview inside the pop up of all the images you selected. You can delete individual images inside the pop up by clicking the trash icon. 
  • If you are ready to move on, click “Submit”. 
  • Finally, click the “Create”  button.

Add Captures from the “Add Captures” page:

  • Click “Add Captures” from the top menu bar on the AgileMapper platform.
  • Select a map from the “Pick a Map” drop down in the top left corner of the screen.
  • Check the “Label Images” checkbox for the A.I. to run on the images. 
  • Either click the blue button in the middle of the screen or drag and drop images onto the screen to initiate image upload.
  • You will see a thumbnail preview of all added images.
  • You can delete individual images clicking the Trash icon in the corner of each image. 
  • Once you have selected all the images for upload, click the blue “Upload Captures” button in the top right corner of the screen. 


Add visual data using “Add Assets” to a map from the map view:

  • When inside a project, you will see a blue “Add Assets” button in the top right corner. 
  • Upon click, you will be sent to the “Add Assets” page. 
  • The “Pick a Map” drop down in the top left corner will be pre-populated with the name of the project you were just viewing. 
  • Check the “Label Images” checkbox for the A.I. to run on the images. 
  • Either click the blue button in the middle of the screen or drag and drop images onto the screen to initiate image upload.
  • You will see a list of all added images.
  • You can delete individual images clicking the Trash icon on the right of each row. 
  • Once you have selected all the visual data for upload, click the blue “Upload Assets” button in the top right corner of the screen.


Drag and drop assets onto a map:

  • While in an already created map, open the folder on your computer with the images you want to add. 
  • Select the files and click and drag over to the map section of AgileMapper.
  • Your images will be uploaded and added to the current map.

9. How do I edit my account info?

Go to your account by clicking your avatar in the top right corner of the AgileMapper desktop platform. Click “Account” in the drop down.

Your account page has your first and last name, avatar, and phone number.

  • To change your avatar, click the “Change” button next to your avatar. 
  • A pop up will appear over the screen. Click the “Select File” button in the pop up
  • Select an image for your avatar. 
  • When finished, click the “Upload” button inside the pop up. 
  • To change your name or phone number, simply click inside the respective text fields and change the content.
  • For all changes made to your account, you must click the “Apply” button before leaving the page or the changes will not be applied.

10. How do I change the organizational view?

  • On the left side of the top menu bar, you will see a drop down menu.
  • This menu allows you to change between different organizations to which you belong.
  • The default setting is to show all of the projects from all of your associated organizations.
  • If you click the organization drop down and select an organization, only projects from that organization will be displayed. 
  • Similarly, only administrative information related to that organization will be displayed when a single organization is selected. Otherwise, when “All” is selected, all organizational information is displayed in the Administrative page. 

11. How can I see my maps?

  • The Maps page is the jomepage of AgileMapper.
  • The Maps page displays all the maps for which you are a member. 
  • Each map has a visual card that displays the high level information associated with each, such as the map’s name, users, location, date of creation, and tags.

12. How can I search my maps?

While in the Maps page, you can search for mapsby keyword, tags, members, and date. 

  • Keyword: Type in a keyword in the Search field. The field will begin to auto-populate based on the information stored inside the platform. 
  • Tags: Search by a Tag(s) by typing them in manually, or selecting a Tag(s) from the Tags drop down. You can select as many Tags to search for as you want. 
  • Members: Search by a Member(s) by typing them in manually, or selecting a Member(s) from the Members drop down. You can select as many Members to search for as you want.
  • Date: Select a start and end date to only see maps that were worked on during the selected time frame. 

13. How can I select a map?

To select a map while in the Maps page, simply click on any map card on the left side of the screen or the arrow button on the right side of the map card.

14. How do I search for an image?

While inside a map and viewing the Assets gallery, you can search for visual data by keyword, tags, members, and date. 

  • Keyword: Type in a keyword in the Search field. The field will begin to auto-populate based on the information stored inside the platform. 
  • Tags: Search by a Tag(s) by typing them in manually, or selecting a Tag(s) from the Tags drop down. You can select as many Tags to search for as you want. 
  • Members: Search by a Member(s) by typing them in manually, or selecting a Member(s) from the Members drop down. You can select as many Members to search for as you want.
  • Date: Select a start and end date to only see images taken during the selected time frame.
  • As each Search field is populated, the images will filter according to the set parameters, and you will only see images in the gallery and on the map that fit the set parameters.

15. How do I view visual data?

  • The Image Viewer provides a preview of the image that has been selected either from the map or from the image gallery. The image view appears in the top left corner of the map. 
  • To view a larger image of any photo, simply click on the icon in the top right corner of the Image Viewer and the image will switch places with the map. 

16. Can I advance through my images?

Once an image is selected, you can advance from one image to another by clicking the arrow icons at the top of the image viewer on the top left corner of the map.

17. Can I rotate an image?

Sometimes photos are oriented in a way that the user did not intend. When this happens, the ability to rotate the image is necessary.

  • After selecting an image, the Rotate icon is located inside the image viewer in the top left corner of the map.
  • Simply click this icon to rotate the image in 90 degree increments. 
  • Once the image is rotated, its new orientation is saved. 

18. How do I switch between the satellite and topographical map view?

AgileMapper currently has three map layer options. The default map is the light topographical, or “streets”, map.

  • The map layer can be changed by clicking on the layer  button in the bottom right corner of the map. Choose between streets, satellite, or dark views. 

19. Can I zoom in and out of the map?

  • To zoom in or out on the map, use the Plus and Minus buttons in the bottom right corner of the map. 
  • You can also gesture back and forth with your finger on the mouse or two fingers on a trackpad to zoom the map in and out. 

20. How do I center the map?

  • To center the map, click on the Compass icon nested under the Zoom buttons in the bottom right corner or the map. 
  • By clicking this button, the map will reorient and center over your project.

21. How do I turn the map or make it oblique?

  • To turn the map into a 3D mode or oblique view, right click and hold on your mouse or press with two fingers on a trackpad and move the mouse or your fingers forward. 
  • To orient the map to face another direction, right click and hold on your mouse or press with two fingers on a trackpad and move the mouse in the direction of the perspective you would like to see the map.

22. How do I add and delete Tags on a Map?

  • After map creation, click the “Add Tags” button on the map card.
  • Upon clicking on “Add Tags”, a pop up will appear where you can add text for a new tag.
  • Tags can be added at any time.
  • Tags can be deleted by hovering over any existing tag and clicking on the “x” that appears inside the tag.

23. How do I add and delete Tags to an Image?

AI tags are automatically added to all captures upon upload, but they can be deleted by the user at any time post upload. 

  • Click on the image either by clicking on the thumbnail in the image gallery or by clicking on a point on the map. 
  • In the left side container, all of that images’ associated metadata will be displayed.
  • Among the metadata will be a list of tags that the AI labeled the image with based on what it could identify in the image.
  • To add your own tags, click the “Add Tags” button included with the list of tags. 
  • Upon clicking on “Add Tags”, a pop up will appear where you can add text for a new tag.
  • Image tags can be added at any time.
  • Image tags can be deleted by hovering over any existing tag and clicking on the “x” that appears inside the tag. 
  • If a tag appears in the “More” section, simply hover over it, click the “x” next to the tag.

24. How do I comment on images?

  • To comment on an image, click on the image, click inside the text box at the bottom of the left side container and begin typing. 
  • Click the “Add Comment” button to add the comment to the image.
  • To reply directly to a Comment, click on the “Reply To” text under the Comment to open a text box. 
  • Click inside the “Reply To” text box and begin typing.

25. How do I delete an image?

  • After selecting an image, the Trash icon is located at the top of the container that features the capture’s metadata and tags.
  • A single image can be deleted by clicking on the Trash icon. 

26. How do I share an image?

  • After selecting an image, the Share icon is located at the top of the container that features the capture’s metadata and tags.
  • A single image can be shared by clicking on the Share icon and selecting “Copy url”.
  • The image’s url can then be shared with anyone and they will be able to view the image outside the platform. 

27. What is the Administration page?

  • User Tab: View all users information within an organization
  • Projects Tab: View all projects information within an organization (name, members, number of capturess, tags and who the project lead is). 
  • Tracking Tab: View all activity related to your organization (volume of captures and tags over time) as well as your organization’s overall number of projects, users, captures and tags).

28. How do I create an Organization?

  • To create a new organization, go to the “Administration” page and click the “Organization” tab.
  • Click on the “Create Organization” button on the right side of the screen. 
  • A pop up will open over the screen, where you can add the organization’s name and an administrator’s email address. 
  • The organization administrator will be the point of contact for the organization.

29. How do I delete an Organization?

  • To delete an organization, go to the “Administration” page and click the “Organization” tab.
  • Click on the organization you wish to delete. 
  • A pop up will open over the screen, where you can change the organization’s name and change administrator’s email address or remove the administrator entirely.
  • Inside this pop up, you can also delete the organization entirely.

30. How do I delete a map?

  • To delete a project, go to the “Administration” page click the “Maps” tab.
  • Click on the map you wish to delete. 
  • A pop up will open over the screen, where you can change the map’s name or add and remove users from the map.
  • Inside this pop up, you can also delete the map entirely. 

31. How do I remove a User?

  • To remove a user either from a project or an organization, go to the “Administration” page and click on the “Users” tab
  • Click on the user you wish to remove either from a project or an organization.
  • A pop up will open over the screen, where you can change the user’s permission level or remove users from the project. 
  • Inside this pop up, you can also delete the user entirely from your organization.

32. How do I use the gallery size slider?

  • Move the slider left to make the image asset thumbnails smaller and show more at a time.
  • Move the slider right to make the image assets larger and show less at a time.

33. How do I use the export tool?

  • Use the export button to download a geojson file for different attributes of your map.
  • Export your entire map by just c licking the Export button.
  • Export your map using certain keywords or tags.
  • Export your map based on a specific time that assets were uploaded or taken.

34. How do I use the multi-select tool?

  • Click the multi-select icon in the top right of the map gallery.
  • choose which assets you want to select by clicking on each thumbnail.
  • Click the select all button to select every asset on the map. Click the clear all button to clear your selections.
  • Once you’ve selected the assets you want, click the export button towards the top of the page to export your selections into a geojson file to download.